Check Out Your Revenue Per Traffic Source In Google Analytics
Learn:
- How to set up Ecommerce Tracking in Google Analytics so that you can see which marketing channels (Adwords/Organic/Social/Email) are generating your revenue.
- How to link your Adwords and Analytics accounts for even more useful keyword and conversion data.
Table of Contents
Why e-Commerce Tracking should be Enabled in Google Analytics for your Online Store
As mentioned above, it allows you to track online transactions, but what kind of data? These all are the reasons why eCommerce store should have set up eCommerce tracking:
- Total revenue of online store
- Each product revenue
- Number of specific product sold
- Total transaction
- Total number of products sold in a particular date range
- No of unique purchase made
- Date-wise revenue generation
- Time of transaction occurs
From these data types, one can easily find out which product is being sold well and which one isn’t. Through this tracking, we get valuable insight of our eCommerce store at just one click & use it in marketing efforts to gain maximum return on Investment (ROI) with less effort. By having exact information about revenue generation from the store, we can justify it and put it in line with our desired expectation. For example, if you are not getting good results from particular products then you can set discounts and offers on it to get ROI from it.
For any eCommerce business, it is necessary that visitors come again & purchase new products from your store. E-Commerce Tracking helps in Re-marketing strategies to target specific audience and enhance conversions because this feature gives data about returning customers and their transactions.
Getting started with Google Analytics
First, start by setting up a primary Google account. You can create a Gmail ID that is unconnected to your personal email accounts if you don’t already have one.
Now, it’s time to connect it to the Analytics account.
- Visit Google Analytics and press the Sign In button. Instantly, a three-step registration guideline will show up on your screen
- Follow the mentioned instructions carefully
- Add the property to track. In this case, it will be your ecommerce site
- Now, mention the name of your ecommerce account, the URL, the name of your site, your preferred time zone, and the industry to which your website belongs
- Choose the Data sharing settings with Analytics. Now, click the Get Tracking ID button.
Remember it is possible to set up 100 different accounts on Google Analytics using a single Google account. List 50 separate properties, including blogs, pages, apps, and websites – all related to your ecommerce site – under a single Google Analytics account.
Worried about messing up during your initial try or want to set up something temporary? Google has you covered! You can shift properties easily between accounts, which bodes well for your marketing efforts.
Set up the tracking code
Complete the setup process and then click on Get Tracking ID. You will immediately notice a pop up featuring the terms and conditions. Read them and agree to them so you can proceed to the next step – receiving the code for Google Analytics.
![]()
Install this code on every single page of your ecommerce website. Without the tracking code, do not expect Analytics to read the information present on the page and supply necessary data.
Keep in mind that the installation process tends to vary from one platform to another. No technical knowledge, however, is necessary to ensure proper application of the code. Simply copy the given code and then paste it in front of the ending head tag of your ecommerce site’s HTML code.
Add the secondary user
Speak to someone who’s managed Google Analytics for many years, and they will tell you that they’ve had issues with account access at some point. Mostly they experience trouble due to problems with their primary account or email.
To avoid such a thing from happening, it is always recommended that you add a secondary user with a different Google account who can provide another point of access. So, overcome problems, such as the loss of your password or hacking attempts by having a backup at all times.
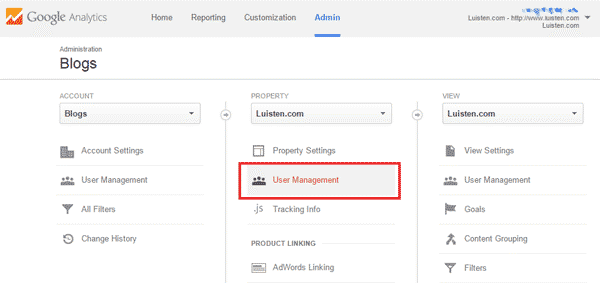
To set up the secondary account, click the Admin option present on the top of your screen. Choose the option marked User Management from the Account menu.
Find the field marked Add Permissions For, and enter the relevant Gmail ID. Choose every option that grants the permissions necessary for the second account to gain access to your Google Analytics profile.

Select your goals wisely
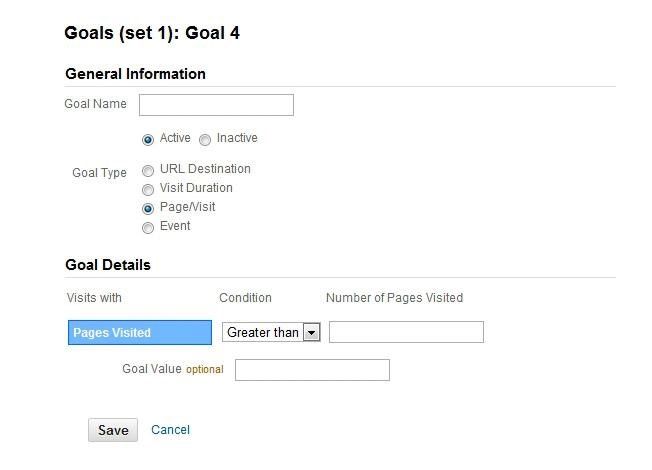
Next on the agenda is figuring out the right way to add goals to Google Analytics. Search under the View column for the Admin link from where you can choose goals. These goals are necessary to inform the Analytics program about important occurrences on your site.
Since you’re able to set a maximum of 20 separate goals, select the ones for your ecommerce site carefully. The majority of businesses tend to set goals for lead form subscriptions, email list subscriptions, and other definitive actions.

Begin by clicking the Next Goal button and selecting custom or existing options depending on your requirements. Once you’re done, tap the Next button. Make sure you set a name that you can easily recall and then click on the Destination button before you head to the following step.
In the destination field, enter the Thank You or confirmation page URL. Then, in the drop down list, select the Begin With option. Now, toggle the preferred value and select the amount for conversion. When completed, simply click the Create Goal option.
Doing so will enable you to monitor essential conversions on your ecommerce site. Selecting the proper goals can mean all the difference between tracking the necessary processes or user actions.
Begin ecommerce tracking
Ecommerce owners can now proceed to start ecommerce tracking through their Analytics account. There are two ways to track ecommerce actions in Analytics, and they include:
- Basic ecommerce tracking
- Enhanced ecommerce tracking
Simply adding code to your website will already track these options. Enabling these options will help you check tracking reports.
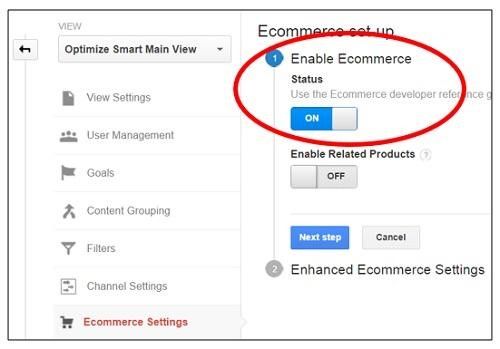
For basic tracking, you need to open the Admin panel and click on the Account tab. Then go to Property and View. Click what you wish to track, and then move on to Ecommerce settings. Set the Ecommerce Status to On.

For Enhanced tracking, find the option marked Enhanced Ecommerce settings. Click on the same and navigate to the Enhance Ecommerce Reporting tab. Toggle it On and then choose the Submit button.
#1 Setup Analytics Ecommerce Tracking
Why: You can see which channels are bringing in the most sales. You can see the ROI of your ad spending. You can determine the value of a visitor from each traffic source.
First be sure you have told Google Analytics that your site is an ecommerce store. Here’s the Google Analytics Help article showing how to enable e-commerce tracking.
Next enable Ecommerce tracking in your store’s admin panel.
Most ecommerce platforms will automatically send ecommerce tracking data once you enable Google Analytics. If your ecommerce platform does not natively support ecommerce tracking I would HIGHLY recommend purchasing a plugin that does it for you because otherwise you might screw up the coding implementation if you’re not a web developer.
Where to enable Ecommerce Tracking
Bigcommerce
In Bigcommerce navigate to Settings >> Analytics Settings >> Google Analytics tab. (more info)
Magento
In Magento, navigate to System –> Configuration –> Google API –> Google Analytics. Select “Enabled” and enter your Google Analytics account number. (more info)
Shopify
In Shopify Admin go to the Preferences screen and enter your Analytics account ID in the Google Analytics account field. (more info)
WP Woocommerce
In WP-Admin go to WooCommerce -> Settings -> Integration. Enter your Google Analytics account number and Check “Add eCommerce tracking code to the thankyou page”
WP OpenCart
OpenCart doesn’t support ecommerce tracking natively, so you need to purchase a plugin like this one.
Wait at least 24 hours and then check if transactions show up in Google Analytics under
Standard Reporting -> Conversions -> Ecommerce -> Product Performance
(If you have an Adwords Account, If you don’t have Adwords just skip to #4.)
#2 Link your Adwords and Analytics accounts
Why: You can see the keywords from Adwords traffic directly in Analytics alongside your organic traffic. You can also see your cost data from Adwords directly in Analytics.
Check out this Google Help article showing how to link Analytics and Adwords.
(If you have an Adwords Account)
#3 Setup Adwords Conversion Tracking
Why: You can easily see the cost per conversion and conversion rate of your Ad Groups and individual keywords directly in the Adwords interface. This conversion tracking is separate from Google Analytics.
See Cost Per Conversion In Adwords (click to enlarge)
How to set it up (for more info check this Google Help article):
In the Adwords Menu click Tools & Analysis -> Conversions
Click +Conversion
Create a name for the conversion like: “Complete Purchase” and set source to Webpage and Click Continue
Set Conversion Category to Purchase/Sale and give a Conversion Value if you want
Click “Don’t add a notification to the code generated for my page”
Leave the other settings on default
Grab the tracking code and put it somewhere in the <body></body> of your final thank-you/confirmation page after completing the sale
Most ecommerce platforms have an option to place tracking codes directly on the thank you page. If not you might have to directly insert it into the template of the thank you page.
Where to put the Adwords Conversion Tracking:
BigCommerce
Go to Settings -> Affiliate Settings of the Bigcommerce control panel and paste in the Conversion Tracking Code box. (more info)
Magento
From the Admin panel, select System > Configuration.
In the Configuration panel on the left under Sales, select Google API. Then, click to expand the Google AdWords – Conversion Tracking section and follow these steps.
Shopify
Go to Preferences → Checkout & Payment in your shop admin and add code in the “Additional Content & Scripts’” text box. (more info)
WP Woocommerce
Requires manually editing the file /wp-content/plugins/woocommerce/templates/checkout/thankyou.php (more info)
WP OpenCart
Requires manually editing the file catalog/view/theme/xxx/template/common/success.tpl (Be careful to follow these directions to avoid incorrect tracking.)
Wait at least 24 hours to check and in the Adwords Menu select Reporting and Tools > Conversions.
In the Conversions table, look under *Tracking Status* to make sure that your conversion tracking has been verified.
#4 Check out your revenue per traffic source in Google Analytics
Revenue By Traffic Source (click to enlarge)
In Google Analytics go to Standard Reporting -> Traffic Sources -> All Traffic
Click “Ecommerce”
Set the Secondary Dimension to “Campaign”
Sort by Revenue Descending
Now you can see which traffic sources are bringing you the most sales.
Also you can set the secondary dimension to “Keyword” to see which keywords are the most valuable.
******************************************
There are a number of self-service advertising platforms that allow you to get your message in front of a new audience in unique new ways.
Web Targeted Traffic is a trusted company world wide and is a legit website that sells targeted traffic.. They deliver targeted high quality real website traffic. That is why more than 75% of our clients are returning clients who already used our service in the past and believe on their quality and professional service.
Whether you are a well-known company or sole online business, Web Targeted Traffic is the most budget friendly way to reach your desired audience, get leads, boost sales, found new customers and generate brand awareness.
They deliver millions of targeted traffic on daily basis to our clients websites. Thousands of happy clients already. There packages are tailored-fit to any business to ensure that specific target audience are reached.
The result will be 100% real visitors who are actually interested in learning more information about a website such as yours!
WebTargetedTraffic.com is The Best Rated Website Traffic Seller of 2018 — Read our reviews here!
Check our Certificate of Website Traffic here…
So what are you waiting for? Choose your traffic package today and let us boost your business by sending thousands of real, unique visitors to your website.
Buy targeted traffic that converts. Increase your website traffic today with our range of affordable traffic services. Get targeted website traffic today!


